Learning the art of indexing your rear derailleur gives crisp, smooth and efficient gear changes with little rattle and clanking.
In just 10 steps we will show you how to adjust your bikes rear derailleur for crisp, smooth and efficient gear changes with reduced rattling and clanking.
Our friends at Bicycle Maintenance Guide have put together some tutorial videos and a step-by-step guide to show us how it's done. You can find tips for other mechanicals in our Spotlight on essential bike maintenance and the repair skills you need for bikepacking and cycle touring.
Tools needed:
- 4mm Allen key (or a multitool)
- Phillips head screwdriver
10 steps to adjusting your rear derailleur
Step 1
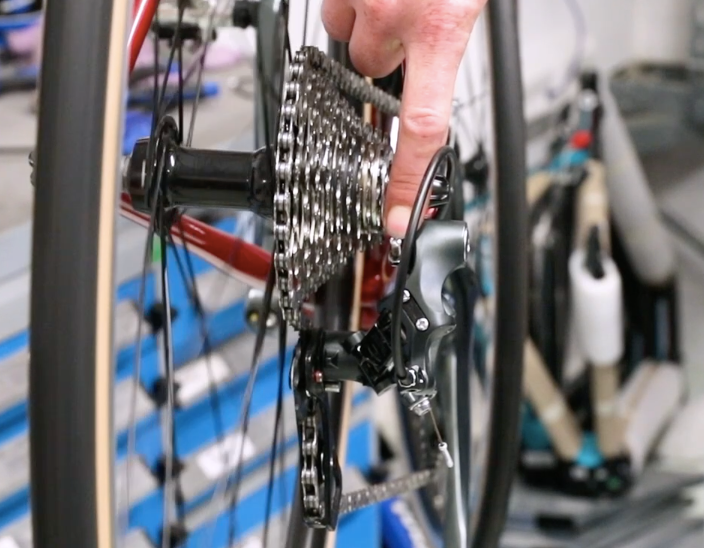
Check the position of the B-screw. The B-screw is the screw which sits against the flat which is on the rear hanger.
Step 2
Adjusting the B-screw alters the position in which the jockey wheel on the derailleur sits beneath the sprocket of the cassette. The gap between the two wants to be around 1cm when in the easiest gear on the cassette.
Step 3
Check the high and low limit positions of the derailleur are in the correct positions.
Step 4
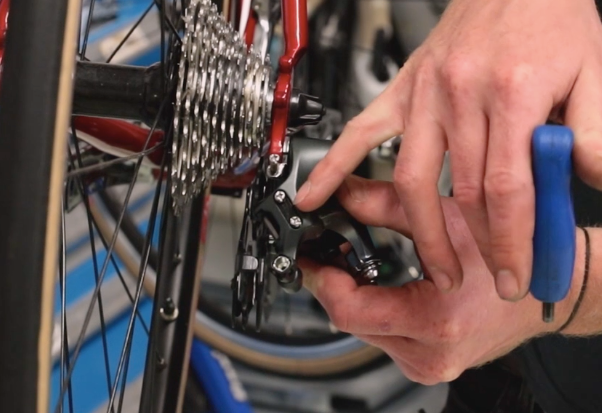
To check the high limit position, change the shifter in to the bottom gear on the cassette and check the position of the derailleur and make sure the chain is running smoothly in that gear. If it is not, this high limit position can be altered by adjusting the high limit screw. By screwing the H-screw anti-clockwise the limit position of the derailleur will move down the cassette towards the frame. Turning the H-screw clockwise causes the limit position of the derailleur to move up to the cassette towards the spokes.
Step 5
To check the low limit position of the derailleur, change the shifter into the second from top gear, and then by pulling on the gear cable which is along the frame check that the derailleur indexes into the easiest gear on the cassette without struggling to change or indexing too far and hitting the spokes.
If the limit position is incorrect and requires adjusting this can be done using the L-screw. By turning the L-screw anti-clockwise the limit position of the derailleur will move to be further up the cassette towards the spokes. By turning the L-screw clockwise the limit position will move away from the spokes.
Step 6
With the limit positions now set it’s time to tune the gears. Start with the chain on the big chain ring on the chainset and the smallest gear on the cassette. I
Step 7
Index/change up one gear on the gear lever and look to see how the gear changes on the cassette.
Step 8
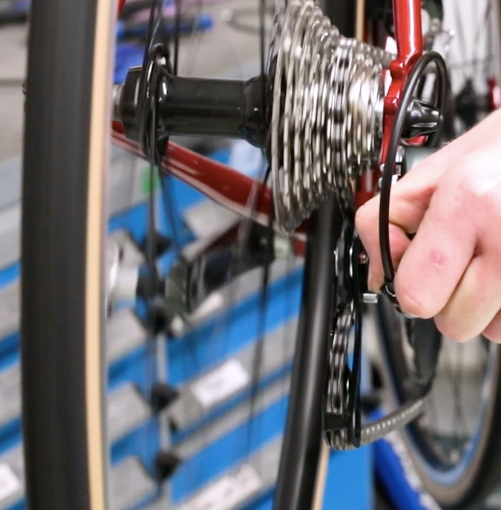
If the chain doesn’t change up on the next sprocket of the cassette, but the chain does move slightly, the cable tension needs to be increased and this can be done by using the barrel adjustors.
Step 9
The barrel adjustor on the rear derailleur should be rotated anti-clockwise, this tensions the cable which moves the derailleur slightly up the cassette causing the chain to change on the next sprocket on the cassette.
Step 10
Carry on running up and down the cassette and if the chain doesn’t change sprocket correctly, adjust the barrel adjustor further until the gear change is smooth and the chain runs over that sprocket in a smooth manner.
Bike Maintenance Series
This guide is part of our bike maintenance series. Explore the other guides:
- Eight Essential Trailside Skills for Bikepacking
- How to Replace an Inner Tube
- How to Deal with a Torn Bike Tyre
- How to Deal with a Snapped Chain
- How to Deal with a Snapped Rear Gear Cable
- How to Deal with a Broken Rear Derailleur
- How to True a Bike Wheel
- How to Adjust a Front Derailleur
Credits
This content is brought to you by Alpkit and our friends at Bicycle Maintenance Guide. They have an app which makes a complete bike maintenance course.
Apple app - https://apple.co/2PFkqMT
Android app - bit.ly/2wOwWCM
This repair has been carried out on a component from a popular brand. If you are using a different component please refer to the manufacturers manual to ensure specific details of the component/task are known. The principles and general skills of the task can be transferred but maybe not the exact details.
Sonder Bikes
-
Sale


Camino Al Apex1 AXS XPLR
- Sram Apex AXS XPLR 12-speed groupset
- Sonder Alpha I25 Gravel UK Made wheelset
$2,449.00
$2,699.00
-
Sale

Camino TI Apex1 AXS XPLR
- Sram Apex AXS XPLR 12-speed groupset
- Sonder Alpha I25 Gravel UK Made wheelset
$3,999.00
$4,249.00
-
Sale


Camino Al Rival AXS XPLR
- SRAM Rival AXS XPLR 13-speed groupset
- Sonder Alpha I25 Gravel UK Made wheelset
$2,949.00
$3,199.00
-
Sale

Camino TI Force AXS XPLR
- SRAM Force XPLR 13-speed groupset
- Sonder Alpha I25 Gravel UK Made wheelset
$5,099.00
$5,449.00
-
Sale

Camino TI Rival AXS XPLR
- SRAM Rival AXS XPLR 13-speed groupset
- Sonder Alpha I25 Gravel UK Made wheelset
$4,549.00
$4,849.00
-
Flat Bar Best Seller


Camino Al Apex1 Flat Bar
- SRAM Apex 12-speed groupset
- Sonder Alpha I25 Gravel UK Made wheelset
$1,399.00
$1,749.00
-
Sale


Camino Al 105
- Shimano 105 R7120 12-speed groupset
- Sonder Alpha I25 Gravel UK Made wheelset
$2,099.00
$2,349.00
-
Highest customer rating


Camino Al GRX1
- Shimano GRX 610 12-speed groupset
- Sonder Alpha I25 Gravel UK Made wheelset
$2,099.00
$2,349.00
-
Sale


Camino Al GRX2
- Shimano GRX 610 12-speed groupset
- Sonder Alpha I25 Gravel UK Made wheelset
$2,199.00
$2,399.00
-
Sale


Camino Al 105 Di2
- Shimano 105 R7170 Di2 12-speed groupset
- Sonder Alpha I25 Gravel UK Made wheelset
$3,099.00
$3,349.00


Camino Al Frame And Fork
Camino Al is built for those moments when the road turns into trail and the...
$949.00
-
Sale

Camino TI 105
- Shimano 105 R7120 12-speed groupset
- Sonder Alpha I25 Gravel UK Made wheelset
$3,649.00
$3,899.00
Your next reads